
In my previous discussion I wanted to install Home Assistant on Raspberry pi cm4 module. Due to supply shortage I was not able to do the installation. But this changed recently now I have a CM4 model to test.

Hardware selection
I have picked a Raspberry pi compute module (cm4) that has the following
- Internal storage (16GB eMMC)
I want to use the eMMC storage over microSD card. This will give Home Assistant quick access to data and long life over any microSD card. - 2GB RAM
Good enough for my project - No WiFi
Home Assistant recommend ethernet over WiFi
PiTray min from Sourcekit
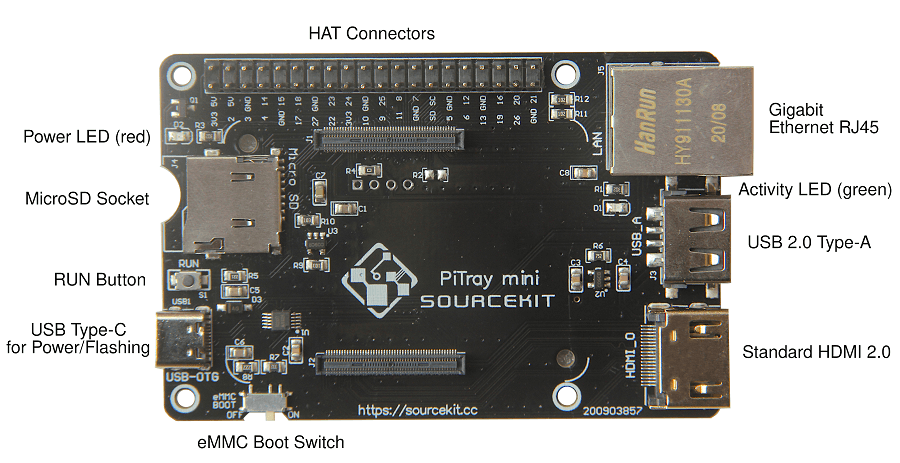
This is one of the chipper option from all available board. I have picked this for ethernet port and eMMC boot options
Setup Hardware
Very simple setup just all CM4 to PiTray min.
Home Assistant setup
Step 1: Setting up my mac (Or PC), install and launch raspberry pi usbboot.
macOS
From a macOS machine, you can also run usbboot, just follow the same steps:
- Clone the usbboot repository
- Install libusb (brew install libusb)
- Install pkg-config (brew install pkg-config)
- Build using make
- Run the binary
git clone --depth=1 https://github.com/raspberrypi/usbboot
cd usbboot
brew install libusb
brew install pkg-config
make
sudo ./rpiboot
Download
- Download and start Balena Etcher
- Download latest Home Assistant iso from GitHub (Latest download links)
Note: for some reason Balena Etcher download from URL option did not work for me as a result I have download the .img file manually
CM4 with eMMC (Flashing Guide)
- Power Off. Unplug micro SD card from PiTray (if any).
- Mount the CM4 (with eMMC) on PiTray.
CAUTION: be careful of the CM4 position, align the CM4 layout corner marks and holes, otherwise CM4 or PiTray would get damaged - Make sure the eMMC Boot switch is at the OFF position.
- On PC/Mac, launch usbboot
> sudo ./rpiboot - Connect PiTray mini with a USB-A to USB-C cable to the PC.
(Note: USB-C to USB-C does not work for me) - Then an external disk like flash drive, aka USB mass storage, would show up on the PC/Mac, write this disk with OS image with Raspberry Pi Imager or Etcher.
- After the image is written and the external drive is umounted from PC, disconnect PiTray mini from the PC.
- Power PiTray with a 15W USB-C power supply. With the red led on, you are good to go. Enjoy & have fun.
- For CM4 with eMMC that already filled with OS image, just start from Step 8 for regular usage.
Start up
- Turn the eMMC Boot switch to ON.
- Attach a ethernet cable for network.
- Power PiTray with a 15W USB-C power supply.
CAUTION: Use a good power supply I used Raspberry official power supply. My initial test with mobile usb-c charger did not work. - Within a few minutes you will be able to reach Home Assistant on homeassistant.local:8123. If you are running an older Windows version or have a stricter network configuration, you might need to access Home Assistant at homeassistant:8123 or http://X.X.X.X:8123 (replace X.X.X.X with your Raspberry Pi’s IP address).
Enabling USB
CM4 by default USB is disabled. I did the following to update the configuration
- Go inside the usbboot folder > recovery
sudo nano recovery/config.txt- Add the following line
dtoverlay=dwc2,dr_mode=host- run pieeprom.sh command
sudo ./update-pieeprom.sh
+ /usbboot/tools/rpi-eeprom-config --config boot.conf --out pieeprom.bin pieeprom.original.bin
+ set +x
new-image: pieeprom.bin
source-image: pieeprom.original.bin
config: boot.conf- Update the bootloader and connect the CM4 (eMMC button Off) to my laptop
sudo  ./rpiboot -d recovery
RPIBOOT: build-date Jan 26 2022 version 20220111~130126 9064cd86
Loading: recovery/bootcode4.bin
Waiting for BCM2835/6/7/2711...
Loading: recovery/bootcode4.bin
Sending bootcode.bin
Successful read 4 bytes
Waiting for BCM2835/6/7/2711...
Loading: recovery/bootcode4.bin
Second stage boot server
Loading: recovery/config.txt
File read: config.txt
Loading: recovery/pieeprom.bin
Loading: recovery/pieeprom.bin
Loading: recovery/pieeprom.sig
File read: pieeprom.sig
Loading: recovery/pieeprom.bin
File read: pieeprom.bin
Second stage boot server done
Note: for some reason USB did not mount. So I have completed the following steps
diskutil list
/dev/disk2 (external, physical):
#: TYPE NAME SIZE IDENTIFIER
0: GUID_partition_scheme *15.6 GB disk2
1: Microsoft Reserved 33.6 MB disk2s1
2: Linux Filesystem 25.2 MB disk2s2
3: Linux Filesystem 268.4 MB disk2s3
4: Linux Filesystem 25.2 MB disk2s4
5: Linux Filesystem 268.4 MB disk2s5
6: Linux Filesystem 8.4 MB disk2s6
7: Linux Filesystem 100.7 MB disk2s7
8: Linux Filesystem 14.9 GB disk2s8Created a temporary folder and mount the disk2s1 (Microsoft Reserved) to that folder
mkdir /user/drive
# Create area to mount FAT partition
mount -t msdos /dev/disk2s1 /user/drive
or
diskutil mount /dev/disk1s2Now open the config.txt in text editor add the following lines
[cm4]
otg_mode=1

[all]
uart_2ndstage=1
dtoverlay=dwc2,dr_mode=host
Testing USB in hass.io
Insert the USB device into the USB port
Configuration > System >Host
click on (...) dropdown > hardware
And your device should be listed under USB
Documentation
- https://sourcekit.cc/#/?id=cm4-with-emmc-flashing-guide
- https://www.raspberrypi.com/documentation/computers/compute-module.html
- https://github.com/raspberrypi/usbboot
- https://www.home-assistant.io/installation/raspberrypi


Leave a Comment