
I talked about earlier that DETA smart products (Tuya products) start replacing espressif esp32/esp8266 chipset with different chipset. As a result we can not flash our devices with opensource firmware (i.e. Tasmota/espHome).
For home automation I usually use Home Assistant. Recently Tuya developers worked with Home Assistant team to Add support for Tuya devices. This is big as Tuya is very popular platform for smart industry. As a result we have a way to use the Tuya devices (DETA devices) into home assistant.
Tuya integration use cloud push meaning integration of this device happens via the cloud and requires an active internet connection. Home Assistant will be notified as soon as a new state is available.
In my home automation I use Raspberry Pi for my Home Assistant server. I prefer all my device to work without internet connection. My preferred method is local push/pull so that the automation does not fill slow responding.
LocalTuya community extension projects, works on local control. This makes the devices locally controllable via home assistant. It only support a small subset of devices from Tuya full catalogue of devices. For me it support DETA smart light & fan switches.
In Home Assistant, do I need Tuya integration and LocalTuya both?
If your list of device is supported by LocalTuya you don’t need to setup Tuya integration. But you have to follow the Tuya integration steps to setup developer account in Tuya platform. As we only need the Local key.
Steps to get the Local Key
Follow the steps from the “Tuya integration“
Before you start
- Your devices need first to be added in the Tuya Smart or Smart Life app.
- You will also need to create an account in the Tuya IoT Platform. This is a separate account from the one you made for the app. You cannot log in with your app’s credentials.
Create project
- Log in to the Tuya IoT Platform.
- In the left navigation bar, click Cloud Development.
- On the page that appears, click Create Cloud Project.
- In the Create Cloud Project dialog box, configure Project Name, Description, Industry, and Data Center. For the Development Method field, select Smart Home from the dropdown list. For the Data Center field, select the zone you are located in. Refer to the country/data center mapping list here to choose the right data center for the country you are in.
- Click Create to continue with the project configuration.
- In Configuration Wizard, make sure you add Device Status Notification API. The list of API should look like this:
- Click Authorize.
Link device by app account
- Navigate to the Devices tab.
- Click Link Tuya App Account > Add App Account.
- Scan the QR code that appears using the Tuya Smart app or Smart Life app.
- Click Confirm in the app.
- To confirm that everything worked, navigate to the All Devices tab. Here you should be able to find the devices from the app.
- If zero devices are imported. Try changing the Data Center and check the account used is the “Home Owner”.
Authorization key
Click the created project to enter the Project Overview page and get the Authorization Key. You will need these for setting up the integration. You will need this if you want to use the Tuya Integration.
Device ID
Navigate to the All Devices tab. Here you should be able to find the devices from the app. Keep the list of Device ID you will need this in next step for local key.
How to extract Local Key
We are going to use the Tuya IoT Platform API section to get the Local key
- Log in to the Tuya IoT Platform.
- In the left navigation bar, click Cloud > Log in to the Tuya IoT Platform.
- In the left navigation bar, click Cloud > API Explorer.
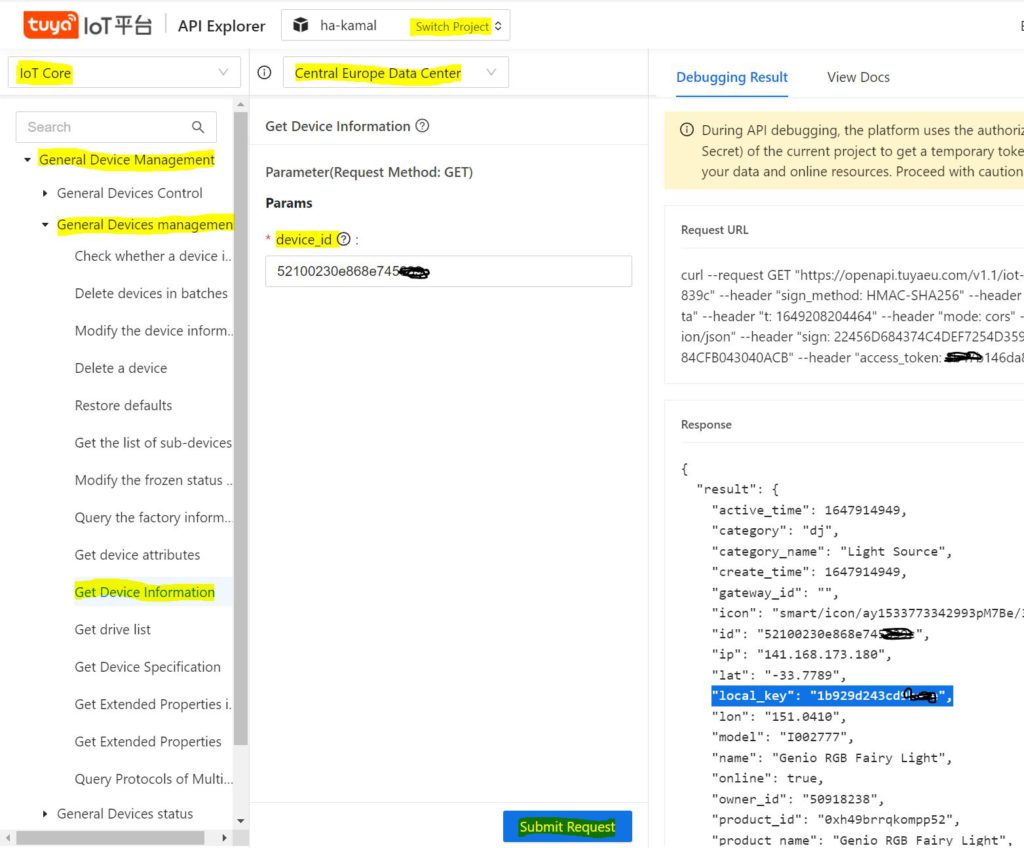
API Explorer
- Make sure your project name is selected
- IOT Core is selected from dropdown list
- Your have correct data center selected
- From the left “General Device management” > “General Device management” > “Get Device Information“
- Use the device id/s from the previous steps and add it to the device_id and click on submit request button
- If look into the response JSON and you will find the local key
"local_key": "1b929d243cd9bexxe"


Leave a Comment