Why n8n?
I’ve been exploring ways to build AI Agents – workflows that can follow my custom logic and complete tasks automatically. I wanted something that could run 24/7 on my home network, easy to monitor, and flexible enough to integrate with different AI models.
n8n stood out because it’s open-source, powerful, and easy to deploy using Docker. I initially considered setting it up on my Raspberry Pi, but since my Synology NAS already supports Docker and a built-in reverse proxy, it made more sense to host it there for better performance and uptime.
Running an automation platform like n8n on my NAS makes it simple to monitor my network servers, run automated AI tasks, and experiment with agentic workflows – all privately, without relying on external services.
In this post, I’ll walk through the full setup process in three parts:
Step 1: Setting up Docker (Container Manager in Synology DSM)
Synology’s Container Manager (previously called Docker) makes it easy to deploy applications like n8n in lightweight, isolated containers.
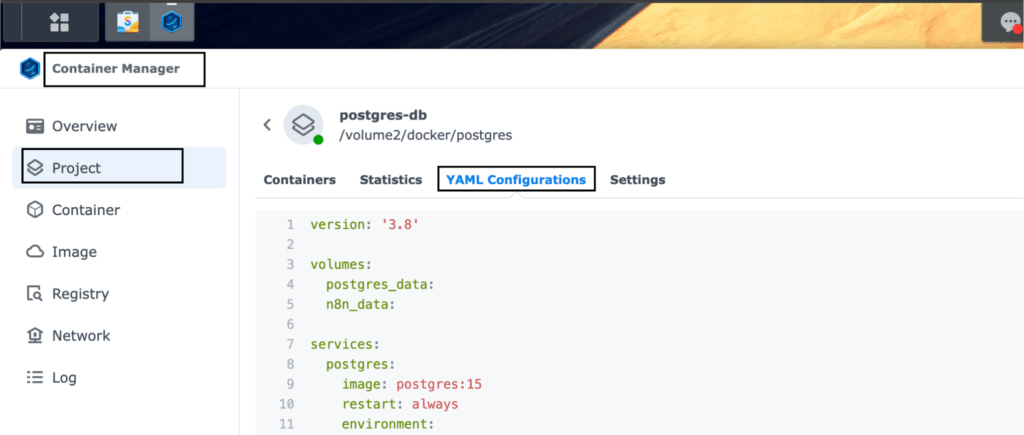
To run n8n properly, we’ll use a small Docker stack with three containers:
- n8n – the main automation platform
- PostgreSQL – for storing workflow data
- Adminer – a lightweight database management tool (optional but useful for inspecting the database)
1. Enable Docker Support
Before you start:
- Make sure your Synology NAS model supports Docker (x86 or ARM64 architecture).
- Open Package Center → Search “Container Manager” → Install.
- Once installed, open Container Manager from the main menu.
2. Prepare Folders for Persistent Storage
We’ll create folders to store configuration and data outside the container, so they persist across updates or reboots.
In File Station, create these folders (you can change the path names if you like):
/volume1/docker/n8n_data3. Create the Docker Compose File
Now we’ll define our stack.
In Container Manager, go to Project → Create → Create with docker-compose.yml
and paste the following content:
version: '3.8'

volumes:
  postgres_data:
  n8n_data:

services:
  postgres:
    image: postgres:15
    restart: always
    environment:
      - POSTGRES_USER = aistack_admin
      - POSTGRES_PASSWORD = ########_admin
      - POSTGRES_DB = ai_db
      - POSTGRES_NON_ROOT_USER = aistack_user
      - POSTGRES_NON_ROOT_PASSWORD = ##########
    volumes:
      - postgres_data:/var/lib/postgresql/data
      - ./init-data.sh:/docker-entrypoint-initdb.d/init-data.sh
    ports:
      - "7000:5432"
    healthcheck:
      test: ['CMD-SHELL', 'pg_isready -h localhost -U ${POSTGRES_USER} -d ${POSTGRES_DB}']
      interval: 5s
      timeout: 5s
      retries: 10
  adminer:
    image: adminer
    container_name: adminer
    restart: unless-stopped
    ports:
      - "7001:8080"
  n8n:
    image: docker.n8n.io/n8nio/n8n
    restart: always
    links:
      - postgres
    environment:
      - DB_TYPE=postgresdb
      - DB_POSTGRESDB_HOST=postgres
      - DB_POSTGRESDB_PORT=5432
      - DB_POSTGRESDB_DATABASE=ai_db
      - DB_POSTGRESDB_USER=aistackdb_user
      - DB_POSTGRESDB_PASSWORD=##########
      - N8N_SECURE_COOKIE=false
      - WEBHOOK_URL=https://n8n.mydomain.com.au/
    ports:
      - 7005:5678
    volumes:
      - n8n_data:/home/node/.n8n
4. Deploy the Stack
Click Next → Deploy, and Container Manager will automatically pull all required images and start the containers.
You can confirm they’re running by checking the Containers tab – all three (n8n, postgres, adminer) should show a green “running” status.
5. Test Your Setup
Once deployed:
- Open n8n: http://your-nas-ip:7005
- Open Adminer: http://your-nas-ip:7001
If everything loads correctly, n8n is now successfully running on your NAS.
Step 2: Setting up Reverse Proxy
To access n8n securely from outside my home network, I configured Synology’s built-in reverse proxy.
This allows me to use a clean domain name (like https://n8n.mydomain.com) instead of an IP address and enables HTTPS for encryption.
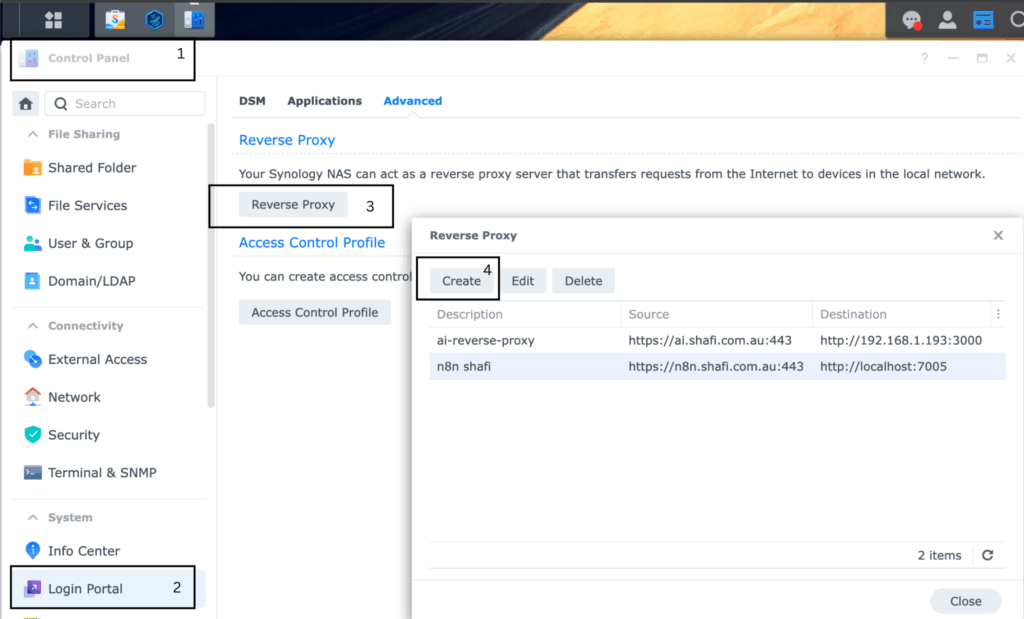
I’ll go through:
- Creating a new reverse proxy entry in DSM
- Forwarding traffic from port 443 to the internal n8n container port
- Setting up Let’s Encrypt SSL certificates
Once this is done, your n8n instance will be accessible securely from anywhere.
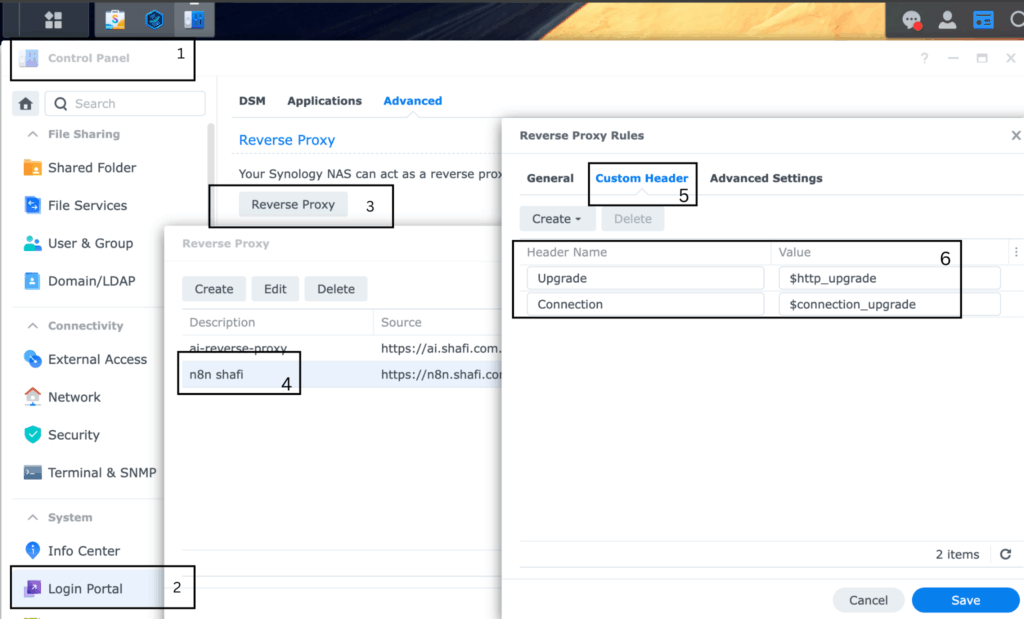
Note: Make sure custom header is populated
Test you setup
Use your domain name to see if you can access from domain name https://n8n.mydomain.com
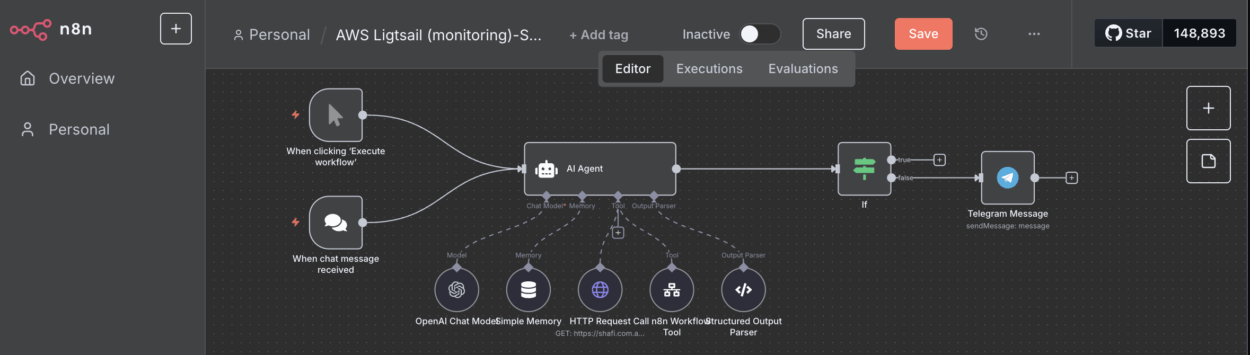
Step 3: Connecting to AI Models (OpenAI, Claude, etc.)
In my setup, I’m using cloud-based LLMs (Large Language Models) via their API interfaces – instead of running a local AI model.
This approach keeps things lightweight and cost-effective, since I don’t need to host or power a GPU server 24/7 on my network.
By connecting n8n to external AI providers like OpenAI, Anthropic’s Claude, or Mistral, I can use powerful AI models directly in my workflows – for text generation, summarization, data enrichment, or intelligent decision-making – without maintaining any heavy infrastructure.
Why Cloud LLMs
Running AI locally can be resource-intensive, especially for large models. Using APIs from cloud providers gives you:
- Scalability: Instantly access powerful models without hardware limits.
- Reliability: Offload compute to the cloud and keep your NAS focused on workflows.
- Flexibility: Easily switch between different providers (OpenAI, Claude, Mistral, etc.) based on task or cost.
Get Your API Keys
To start, you’ll need API credentials from your preferred AI provider:
- OpenAI: https://platform.openai.com/account/api-keys
- Anthropic (Claude): https://console.anthropic.com
- Mistral: https://mistral.ai
Store these keys securely – we’ll reference them in your n8n environment or within credentials manager.
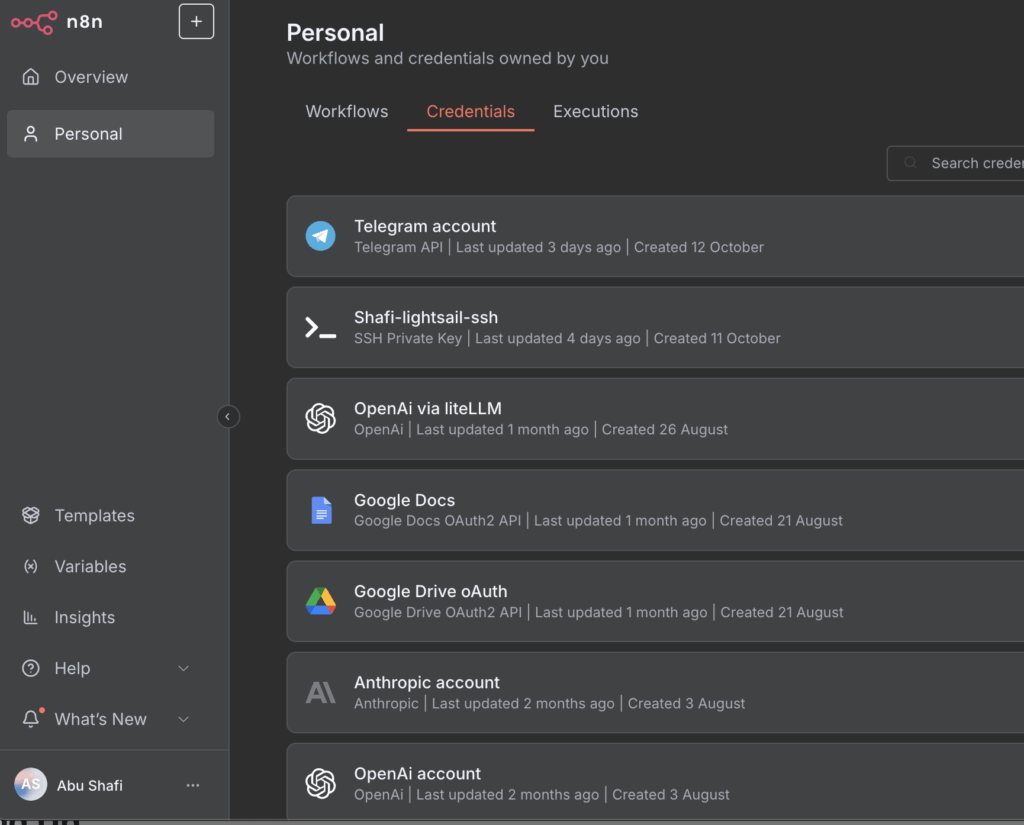
Add API Credentials in n8n
Use n8n’s Built-In Credentials Manager:
- Open n8n → Credentials tab
- Create a new HTTP Request or OpenAI credential
- Paste your API key securely there
The final step is integrating AI APIs into n8n workflows.
With API keys from providers like OpenAI, Claude, or Mistral, n8n can send prompts, process data, and even chain multiple actions into agent-style flows.
Wrapping Up
With these three steps complete, my Synology NAS is no longer just a storage device – it’s now an always-on, AI-enhanced automation platform. It monitors my servers, runs custom workflows, and serves as a testing ground for building intelligent agents.
In a follow-up post, I’ll share some example n8n workflows that use OpenAI and Claude to perform real tasks automatically.


Leave a Comment